
How to Restore Cast Iron at Home: A Complete Guide
- 1. Introduction: Why Cast Iron Restoration Matters
- 2. Essential Supplies for Cast Iron Restoration
- 3. Step-by-Step Process for Restoring Cast Iron
- 4. Pro Tips for Maintaining Your Restored Cast Iron
- 5. Cast Iron Restoration Safety Considerations
- 6. How to Finish Your Cast Iron Restoration Like a Pro
Cast iron cookware is known for its durability and excellent heat retention, making it a favorite in many kitchens. However, over time, even the best cast iron items can become worn out or rusty. Restoring cast iron at home is an achievable and satisfying process that can breathe new life into your cookware. Whether you’re dealing with an old skillet or a vintage Dutch oven, this complete guide will walk you through the process of restoring your cast iron without damaging it. Let's dive into the art of cast iron restoration!

Miracle Method Surface Refinishing / miracle tub refinishing
Santa RosaSonoma CountyCalifornia
3200 Dutton Ave Suite #325, Santa Rosa, CA 95407, USA
Essential Supplies for Cast Iron Restoration
Before you begin, gather the necessary tools and supplies to ensure a smooth restoration process. Here’s what you’ll need:
- Steel Wool or Sandpaper: For removing rust and old seasoning.
- Cast Iron Cleaner: Products like Bar Keepers Friend can help clean your cast iron without causing damage.
- Vegetable Oil or Flaxseed Oil: Used for seasoning the cast iron after cleaning.
- Oven or Stove: You’ll need an oven for the seasoning process or a stovetop for finishing touches.
- Gloves and Safety Glasses: To protect your hands and eyes during the restoration process.
- Paper Towels: For applying oil and wiping away excess seasoning.
Step-by-Step Process for Restoring Cast Iron
Follow these detailed steps to restore your cast iron cookware and get it looking as good as new:
- Step 1: Scrub the Cast Iron
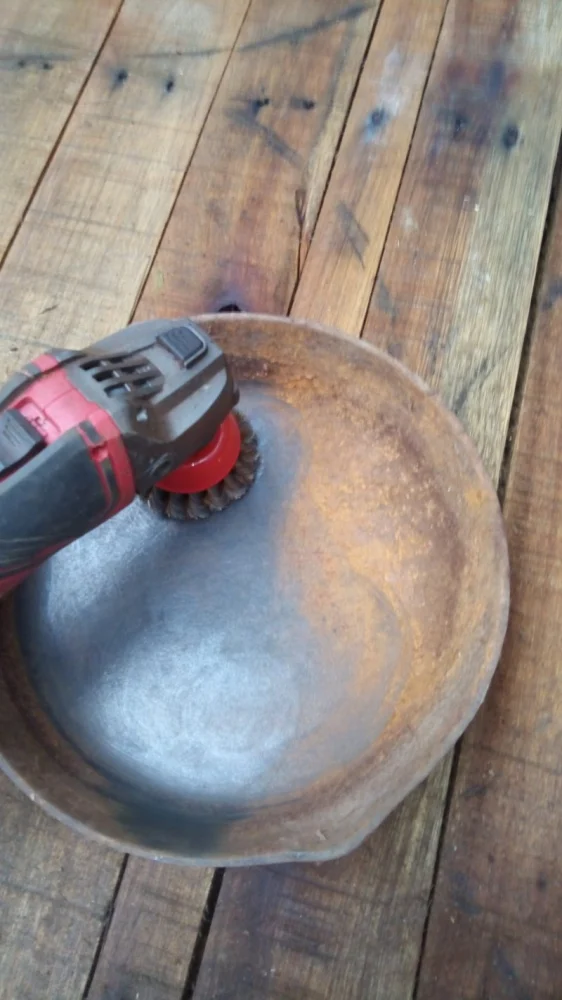
Begin by removing any existing rust or debris. Use steel wool or sandpaper to scrub away any rust, old seasoning, or dirt. It’s important to get a smooth surface to work with, so take your time in this step. - Step 2: Clean Thoroughly
After you’ve scrubbed off the rust, thoroughly wash your cast iron with hot water and a small amount of soap. While many experts advise against using soap on cast iron, it’s okay here since you’re stripping it down for restoration. Dry the cookware immediately after washing to prevent further rusting. - Step 3: Apply Oil for Seasoning
Apply a thin layer of vegetable or flaxseed oil all over the cast iron. Use a paper towel to evenly coat the surface. Don’t use too much oil; just a light coat is enough to protect and season the surface. - Step 4: Bake to Set the Seasoning
Preheat your oven to 450°F (232°C) and place the cast iron upside down on the middle rack. Place a layer of foil on the bottom rack to catch any drips. Bake for about an hour. After an hour, turn off the oven and let the cast iron cool inside. - Step 5: Repeat the Process
For a more durable seasoning, you may want to repeat the oiling and baking process 2-3 times. Each layer will strengthen the seasoning, making your cookware non-stick and resistant to rust.
Pro Tips for Maintaining Your Restored Cast Iron
Now that your cast iron is restored, here are a few tips for keeping it in top condition:
- Use Proper Cooking Methods: Avoid cooking acidic foods like tomatoes for long periods, as they can break down the seasoning. Stick to cooking fatty foods like bacon or sautéing vegetables to maintain the seasoning.
- Regular Cleaning: After each use, clean your cast iron with a non-abrasive scrubber and warm water. Avoid soaking it in water, as this can lead to rust.
- Re-season When Needed: If the surface starts to lose its shine or becomes sticky, it’s time to re-season your cast iron. Simply follow the same steps for oiling and baking.
- Store Properly: Always store your cast iron in a dry place. If you stack other cookware on top, place a paper towel or cloth between the pieces to absorb any moisture.
Cast Iron Restoration Safety Considerations
When restoring cast iron at home, safety is important. Here are some key considerations:
- Wear Gloves: Steel wool and other abrasive materials can be harsh on your hands. Protect yourself by wearing gloves.
- Ventilate Your Workspace: During the seasoning process, your oven may emit smoke. Make sure your kitchen is well-ventilated to avoid discomfort or potential safety hazards.
- Handle with Care: Cast iron is heavy and retains heat for a long time. Always use proper gloves when handling hot cookware.
How to Finish Your Cast Iron Restoration Like a Pro
Once your cast iron is fully restored, you’ll want to maintain it for long-term use. To finish the restoration process, here are a few additional tips:
- Buff Out Imperfections: If you notice any rough spots after the restoration process, gently buff them out with fine sandpaper or a scraper.
- Store with Care: Make sure to store your cast iron with a light coating of oil to protect it from rust.
- Embrace the Patina: Over time, your cast iron will develop a beautiful, well-used patina. This is a sign of a truly well-loved cooking tool.
With patience and the right techniques, restoring cast iron at home is a rewarding and satisfying process. You’ll not only save money but also preserve a piece of kitchen history. If you need high-quality restoration products or services, check out Cast Iron Restoration for all your restoration needs!






 NV Kitchen and Bath Richmond5.0 (24 reviews)
 Allura Bath & Kitchen4.0 (75 reviews)
 Bath Fitter4.0 (241 reviews)
 Castle Refinishing0.0 (0 reviews)
 Aurora Kitchens & Interiors4.0 (40 reviews)
 GRANITE AURORA5.0 (1 reviews)
 How to Refurbish a Cast Iron Skillet at Home: A Complete Guide
 Best Products for Cast Iron Restoration Service: Top Tools and Products
 Simple At-Home Techniques for Cast Iron Restoration | Restore Your Cookware
 How to Restore Cast Iron at Home | A Complete Guide for Beginners
 How Long Does Cast Iron Skillet Refinishing Take? Realistic Timeline for Restoration
 What to Avoid When Attempting Cast Iron Refinishing: Common Mistakes to Watch Out For