
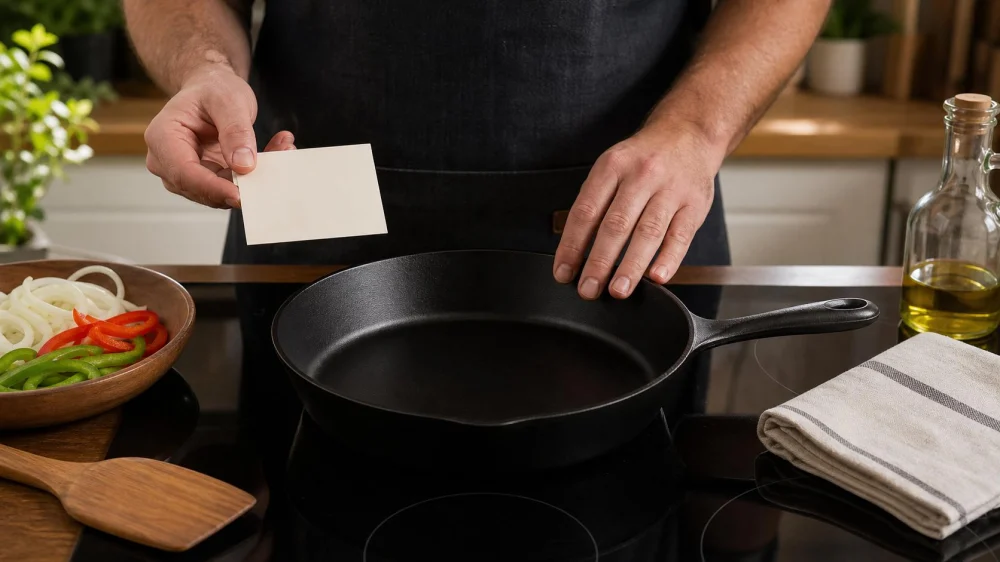
Restored Cast Iron: Plan the First Cook With Confidence
On this page
- Quick answer
- Review the restoration notes
- Inspect before adding food
- Follow the first-wash and drying directions
- Choose a forgiving first meal
- Preheat gradually and control heat
- Use a simple cooking sequence
- Clean up without undoing good work
- Read the surface after cooking
- Know when to contact the restorer
- Build a repeatable care plan
- First-cook checklist
- Frequently asked questions
- Sources and evidence notes
- Next steps
Quick answer
Before the first cook in restored cast iron, confirm whether the piece is bare or seasoned, what oil and curing process were used, and whether the restorer wants it washed first. Inspect for cracks, residue, stickiness, and complete dryness. Start with moderate heat, enough cooking fat, and a simple meal; then clean, dry, and store the pan according to the restoration instructions.
The first meal is a controlled return to normal use, not a dramatic seasoning test. A professionally restored pan should arrive with clear condition and care information. If the surface looks unstable or the piece was decorative and its history is uncertain, pause before cooking.

Miracle Method Surface Refinishing / miracle bathtub refinishing
Santa RosaSonoma CountyCalifornia
3200 Dutton Ave Suite #325, Santa Rosa, CA 95407, USA
Review the restoration notes
Keep the invoice or work report beside the pan and identify exactly what was done. “Restored” can mean light rust removal and seasoning, complete stripping and reseasoning, crack assessment, grinding, polishing, or cosmetic work for display only.
Ask the restorer:
- Was the pan stripped to bare iron?
- How was rust, residue, paint, or old seasoning removed?
- Was any welding, brazing, filling, grinding, or metal repair performed?
- Was the piece assessed for cracks, pitting, warping, and stability?
- What oil or coating was applied?
- How many seasoning cycles were completed?
- Should the surface be washed before first use?
- Are there foods, heat levels, or cleaning methods to avoid initially?
- Is the piece approved by the restorer for cooking or only for display?
For an inherited or vintage piece, ask whether its prior use is known. Cast iron used for lead melting, industrial work, painting, or non-food purposes should not be assumed safe for cooking based on appearance alone.
Inspect before adding food
Place the cool, dry pan under bright light. Look at the cooking surface, rim, walls, underside, handle roots, pour spouts, and any lid contact area.
A new seasoning layer may be satin rather than glossy and can vary slightly in tone. Warning signs include:
- a visible crack or line that changes when the pan is handled;
- loose flakes or chips;
- thick tacky or gummy patches;
- orange rust or active moisture;
- powder, grit, chemical odor, or oily residue that was not explained;
- sharp burrs or fresh grinding debris;
- a repaired area not disclosed in the work order;
- movement at an attached handle or fitting;
- a pan that rocks or spins substantially on the intended cooking surface.
Do not heat a cracked or structurally uncertain piece. A crack can grow with thermal expansion and release hot food or oil. Photograph the concern and contact the restorer.
Follow the first-wash and drying directions
Some restorers return a pan ready to cook; others recommend a gentle first wash. Follow the written instruction. A typical wash may use warm water, a small amount of dish soap, and a soft brush or nonabrasive pad, but the restorer’s coating and process control the method.
Avoid soaking, the dishwasher, harsh oven cleaner, aggressive metal tools, and long contact with water. Those methods can attack seasoning and restart rust.
Rinse away all soap and loosened material. Dry immediately with a clean towel. Then use gentle heat only if the restorer recommends it, watching continuously until residual moisture is gone. An empty pan does not need to smoke to become dry.
If instructed, wipe a very thin film of approved oil over the warm, dry surface and buff until it no longer looks wet. Excess oil is a common cause of sticky seasoning.
Choose a forgiving first meal
Select food that lets you observe heating, release, and cleanup without filling the pan with sugar, thick glaze, or a large volume of oil. The goal is a normal meal, not an internet ritual.
Good options include:
- sautéed onions, peppers, or sliced potatoes with adequate oil;
- a grilled sandwich;
- cornbread or another simple baked item when the pan is oven-safe;
- skin-on chicken pieces started with controlled moderate heat;
- a simple shallow sear followed by an appropriate finish.
Eggs can work on a well-seasoned surface, but they demand heat and fat control and may create an unfair pass-fail test. Sugary sauces can burn and stick. Long acidic braises may change a young seasoning layer, though acidic food is not universally forbidden in cast iron. Follow the restorer’s advice.
Use fresh food and normal safe-handling practices. For meat, poultry, seafood, and egg dishes, use a food thermometer and current USDA safe-temperature guidance rather than judging safety by pan colour or sear.
Preheat gradually and control heat
Cast iron stores heat and responds more slowly than thin cookware. Match the pan base to the burner and start lower than you might with stainless steel or aluminum. Give the pan time to warm across the cooking surface.
Avoid blasting an empty restored pan on maximum heat. Rapid, uneven heating can create hot spots, burn fresh seasoning, smoke oil, and increase thermal stress. Never walk away from an empty pan.
For a skillet, warm on low to medium-low, then adjust according to the food. Add cooking fat before the surface becomes excessively hot. The correct sequence varies: some foods start in a cool pan, while others benefit from preheating. Use the recipe and pan condition.
Use the smallest stable burner that heats the base evenly. On induction, power can rise very quickly; begin with a low setting and follow the cooktop manual. In the oven, verify that handles, knobs, lids, and any restoration material are oven-safe.
Use a simple cooking sequence
- Prepare and dry ingredients before heating the pan.
- Place the dry pan on the appropriate burner or preheat the oven as the recipe directs.
- Warm the pan gradually.
- Add a measured amount of suitable cooking fat.
- Add food without overcrowding.
- Let a natural crust form before trying to move food that should sear.
- Adjust heat rather than repeatedly lifting or scraping.
- Use wood, silicone, or smooth-edged metal utensils as the restorer permits.
- Check food safety with an appropriate thermometer.
- Move the pan using a dry secure mitt; the handle becomes hot.
Keep children, loose sleeves, and paper towels away from the hot pan. Turn the handle away from traffic without placing it over another burner. A helper should not grab a cast iron handle unless they know it is hot.
Clean up without undoing good work
Let the pan cool enough to handle safely but do not leave wet food sitting for hours. Remove food to serving or storage containers; do not use the skillet as a refrigerator container.
Follow the restorer’s cleaning method. Often, warm water, a small amount of dish soap, and a brush are sufficient. For stuck food, use a pan scraper or brief warm-water loosening rather than prolonged soaking. Coarse salt may scratch some finishes and is not required for every cleanup.
Rinse, towel-dry immediately, and apply gentle heat if directed to remove remaining moisture. Add only a trace of approved oil if the care plan calls for it, then buff until the surface looks dry.
Do not put a hot pan into cold water. Thermal shock can warp or crack cookware and can create steam and splatter hazards. Do not store a lid tightly on a pan that is not completely dry.
Read the surface after cooking
After the pan is clean and dry, compare it with the return photos. A slightly uneven sheen or temporary dull spot can be part of normal seasoning development. The surface should not be thick, sticky, rusty, or actively shedding.
A little dark residue on a towel may be seasoning or carbon, but repeated heavy black transfer deserves review of cleaning, oil quantity, and curing. Do not keep adding oil over loose material.
Check food release in context. Sticking can come from insufficient preheat, too much heat, too little fat, wet food, moving it too early, or an immature surface. One meal does not prove that restoration failed.
Record the food, heat setting, fat, utensils, cleanup, and surface change. This helps the restorer distinguish technique from a coating problem.
Know when to contact the restorer
Stop using the pan and contact the restorer for:
- a new or widening crack;
- large flakes exposing bare iron;
- persistent chemical, rancid, or metallic odor;
- sticky areas that remain after correct cleaning;
- rust that returns immediately despite full drying;
- undisclosed repair material;
- sharp or loose metal;
- a structural change in the handle, rim, or base;
- heavy repeated black residue transfer.
Send clear photos, the restoration date, first-wash method, food and oil used, heat source, and what changed. Do not strip or grind the pan before the restorer can evaluate the work.
Build a repeatable care plan
- Cook regularly with controlled heat and adequate fat.
- Clean soon after cooking using the approved method.
- Dry immediately and completely.
- Apply only a thin oil film when needed.
- Store in a dry cabinet with air circulation.
- Place a paper or cloth separator between stacked pans.
- Keep lids slightly ajar or separate when moisture could be trapped.
- Check rims, handles, and undersides periodically.
- Address new rust before it spreads.
First-cook checklist
- Confirm the pan is restored for food use.
- Save the oil, process, and care instructions.
- Inspect for cracks, flakes, rust, residue, and stickiness.
- Wash first only as directed.
- Dry completely without overheating.
- Choose a simple food and moderate heat.
- Use enough cooking fat and avoid overcrowding.
- Verify food safety with a thermometer.
- Clean, dry, and lightly oil as instructed.
- Photograph and report structural or coating concerns.
Frequently asked questions
Do I have to wash restored cast iron before cooking?
Follow the restorer’s instructions. The answer depends on the final cleaning, oil, curing process, packaging, and how the pan was handled after restoration.
Should the first meal be bacon?
Not necessarily. Bacon can contain sugar and may stick. Choose any simple recipe that fits the surface, heat source, and care plan.
Can I use soap?
Modern dish soap in a small amount is often compatible with seasoning, but the restorer’s instructions control the first cleanup. Avoid soaking and harsh stripping cleaners.
Why did food stick?
Possible reasons include heat, preheating, fat, moisture, crowding, timing, and a young seasoning layer. Review the process before assuming the restoration failed.
Is black residue dangerous?
Its source must be identified. Stop for heavy or persistent transfer, chemical odor, loose flakes, or unknown vintage history and ask the restorer or an appropriate professional.
Can I reseason immediately?
Do not add layers over an unexplained problem. Clean and assess the surface, then follow the restorer’s touch-up instructions.
Sources and evidence notes
- USDA Food Safety and Inspection Service: Food Thermometers explains why internal temperature, not colour or sear, verifies food safety.
- USDA: Safe Minimum Internal Temperature Chart provides current minimum temperatures for meat, poultry, seafood, eggs, and casseroles.
Restoration and seasoning methods vary. The restorer’s documented materials and process must guide the individual pan.
Next steps
Ask the restorer for the return-to-use instructions in writing. Inspect and photograph the cool pan, choose one simple recipe, and record heat, fat, food release, cleanup, and surface changes. If the first cook is uneventful, repeat the same care routine rather than adding unnecessary seasoning layers.





 My Kitchen and Bath4.0 (122 reviews)
 Five Star Bath Solutions of Minneapolis4.0 (255 reviews)
 Avan Refinishing Solutions LLC4.0 (24 reviews)
 ReNU Kitchens4.0 (31 reviews)
 Luxury Bath of Tampa Bay4.0 (397 reviews)
 NuFinishPro of Ladera Ranch5.0 (30 reviews)
 How to Refurbish a Cast Iron Skillet at Home: A Complete Guide
 Best Products for Cast Iron Restoration Service: Top Tools and Products
 Simple At-Home Techniques for Cast Iron Restoration | Restore Your Cookware
 How to Restore Cast Iron at Home | A Complete Guide for Beginners
 How Long Does Cast Iron Skillet Refinishing Take? Realistic Timeline for Restoration
 What to Avoid When Attempting Cast Iron Refinishing: Common Mistakes to Watch Out For