
- 1. Understanding the Tile Removal Process
- 2. Essential Tools for Safe Tile Removal
- 3. Step-by-Step Guide to Removing Tile
- 4. Common Mistakes to Avoid
- 5. Protecting Your Subfloor During Tile Removal
- 6. Real-life Example: Successful Tile Removal Project
1. Understanding the Tile Removal Process
Removing old tile may seem like a straightforward task, but it requires careful planning to avoid damaging the subfloor. The process involves more than just pulling up the tile; it requires understanding the underlying material and choosing the right tools to safely remove the tile without causing harm to the subfloor. Understanding the different types of tiles and adhesives used in your floor will help you make informed decisions about your approach.

Miracle Method Surface Refinishing / miracle bathtub refinishing
Santa RosaSonoma CountyCalifornia
3200 Dutton Ave Suite #325, Santa Rosa, CA 95407, USA
2. Essential Tools for Safe Tile Removal
Before starting, it's important to gather the right tools. Here are some essential items for the job:
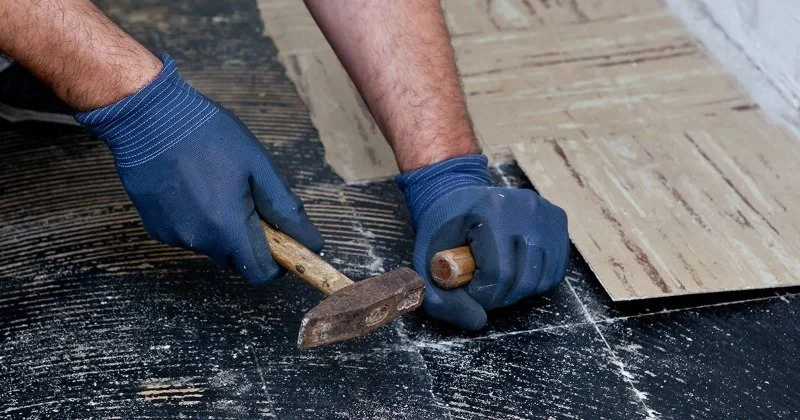
- Tile scraper or pry bar for lifting tiles.
- Hammer to tap the scraper into place.
- Chisel for stubborn tiles and grout removal.
- Protective gloves, goggles, and a dust mask to ensure safety.
- A utility knife to score the tile or grout lines.

America Refinishing Pros / america refinishing pros
9510 SW 137th Ave, Miami, FL 33186, USA
3. Step-by-Step Guide to Removing Tile
Follow these steps to safely remove your old tile:
- Step 1: Prepare the area by removing any furniture and covering the floor with protective sheets to catch debris.
- Step 2: Use a utility knife to score the grout around the edges of the tiles.
- Step 3: Insert the tile scraper under the edge of the tile and gently tap with a hammer to lift the tile.
- Step 4: Continue removing tiles, starting from a corner and working your way across the room. Use the chisel for any stubborn pieces.
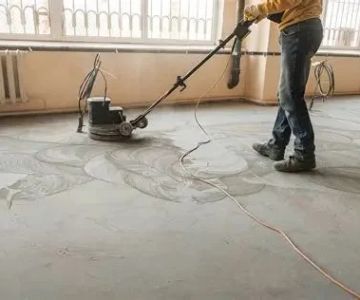
- Step 5: After the tiles are removed, clean the subfloor thoroughly to remove any adhesive or grout residue.
4. Common Mistakes to Avoid
When removing tile, several common mistakes can lead to costly damage:
- Rushing the Process: Trying to pull up tiles too quickly can damage the subfloor. Take your time and work carefully.
- Using the Wrong Tools: Avoid using improper tools, such as large pry bars or blunt objects, as they can damage both the tile and the subfloor.
- Skipping Safety Gear: Always wear protective gloves, goggles, and a dust mask to prevent injury from broken tile or flying debris.
5. Protecting Your Subfloor During Tile Removal
The most important aspect of the tile removal process is protecting the subfloor. Here are some tips to avoid damaging it:
- Start from the edges where the subfloor is more likely to be intact.
- Use a tile scraper with a flat blade to distribute pressure evenly, preventing gouging or cracking of the subfloor.
- Work slowly and remove tiles one at a time to maintain control over the process.
6. Real-life Example: Successful Tile Removal Project
A successful tile removal project can save you money and effort. In one example, a homeowner used a tile scraper and hammer to carefully remove ceramic tiles from their kitchen floor. By taking the time to properly score the grout lines and avoid damaging the subfloor, they were able to complete the project without any issues. The subfloor was left intact and ready for the installation of new tiles. This case illustrates how taking the right precautions can make a huge difference in the outcome of your project.


 Garcia Construction Group5.0 (9 reviews)
 All Surface Experts, Co.4.0 (18 reviews)
 Bathtub Reglazing LB4.0 (15 reviews)
 Jsgeneralconstructionllc5.0 (9 reviews)
 Miles Systems Manufacturing5.0 (12 reviews)
 Greystone Kitchen Company4.0 (38 reviews)
 How to Refurbish a Cast Iron Skillet at Home: A Complete Guide
 Best Products for Cast Iron Restoration Service: Top Tools and Products
 Simple At-Home Techniques for Cast Iron Restoration | Restore Your Cookware
 How to Restore Cast Iron at Home | A Complete Guide for Beginners
 How Long Does Cast Iron Skillet Refinishing Take? Realistic Timeline for Restoration
 What to Avoid When Attempting Cast Iron Refinishing: Common Mistakes to Watch Out For