
Cast Iron Heat Ring: Stove Contact, Stability, and Use
On this page
- Quick answer
- Understand the heat ring
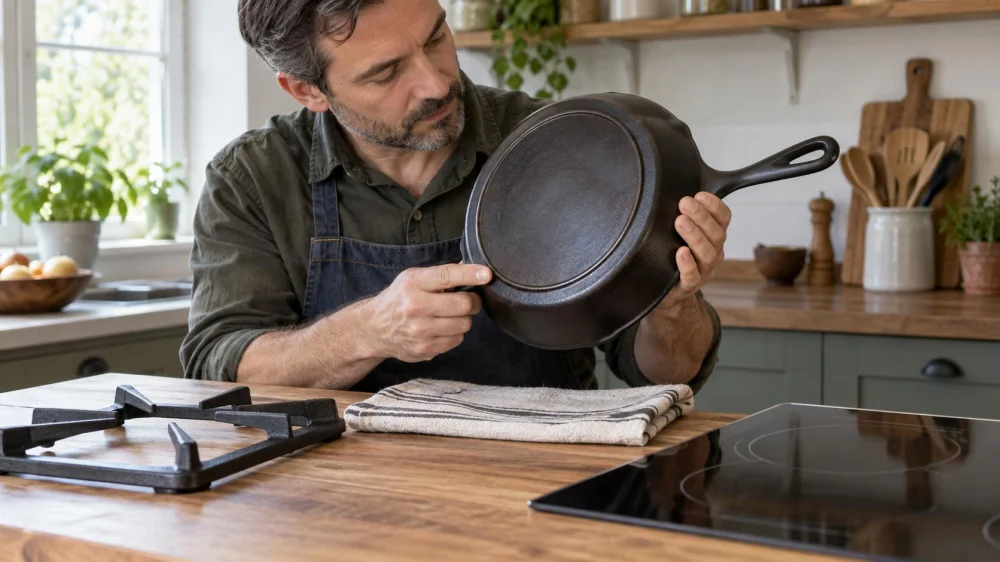
- Inspect the cool underside
- Test stability with the stove off
- Check gas-grate contact
- Protect smooth cooktops
- Heat gradually and observe response
- Clean and store the ring
- Know when assessment is needed
- Limits and important notes
- Frequently asked questions
- Sources and evidence notes
- Conclusion and next steps
Quick answer
A cast iron heat ring is a raised rim on the pan's underside. Before cooking, inspect it for cracks, heavy rust, sharp damage, residue, and uneven wear, then test the cool empty pan on the intended switched-off cooking surface. It should sit securely without rocking or interfering with grates, sensors, or cooktop instructions. Lift rather than slide it on smooth surfaces, preheat gradually, match burner size, and stop if the pan is unstable or the appliance maker excludes that cookware.

America Refinishing Pros / america refinishing pros
9510 SW 137th Ave, Miami, FL 33186, USA
Understand the heat ring
Heat rings appeared on many older cast iron pieces and can help position a pan on certain stove designs. Shapes, depths, and casting quality vary, and a ring that suits one grate may contact another surface differently.
The ring is not proof of age, brand, value, flatness, or compatibility. Evaluate the entire base, pan structure, and appliance together.

Carefree Koatings / miracle method louisville ky
8919 Renetta Ct, Cincinnati, OH 45251, USA
Inspect the cool underside
- Clean away loose dust and residue gently.
- Look for cracks crossing the ring or base.
- Check for sharp chips, heavy scaling, or active rust.
- Observe casting seams, tool marks, and areas worn unevenly.
- Confirm the pan bottom is free of grease or grit that could smoke or scratch.
- Photograph uncertain areas before further cleaning.
Test stability with the stove off
Place the cool empty pan gently on the intended burner or grate while everything is switched off and cool. Check whether normal handle pressure causes significant rocking, tipping, or sliding. Keep the handle clear of edges and nearby burners.
Do not use coins, foil, improvised rings, or loose shims to level cookware on a burner. They can shift, interfere with heat, or violate appliance instructions.
Check gas-grate contact
The pan should be supported securely by the grate, not balanced precariously on a narrow ring or caught between supports. Confirm the base does not block safe burner operation and the handle orientation does not crowd another flame.
Use the burner size and flame pattern recommended by the appliance and cookware guidance. Flames should not climb the pan's sides or heat the handle unnecessarily.
Protect smooth cooktops
Glass and ceramic cooktops can be scratched or damaged by grit, rough casting, impacts, sliding, or incompatible cookware. Check the appliance manual for base-flatness, diameter, weight, and surface requirements before use.
Lift and place the pan; do not drag it. A heat ring may reduce contact or create concentrated contact points, so appliance instructions take priority.
Heat gradually and observe response
- Start with the clean dry pan centered on a compatible burner.
- Use low to moderate heat initially.
- Allow time for heavy iron to distribute heat.
- Watch for unexpected rocking, odour, smoke, or movement.
- Use dry heat protection on handles.
- Turn off heat and let the pan cool in a safe place.
Clean and store the ring
After the pan cools, clean the underside as well as the cooking surface. Dry the ring's inner and outer corners, then apply only the care appropriate to bare or enameled iron. Excess oil underneath can become sticky or smoke.
Store on a stable shelf with a dry liner if needed, without stacking weight on a vulnerable rim. Keep the base free of moisture and abrasive debris.
Know when assessment is needed
Stop use for cracks, unstable rocking, sharp losses, loose handles, unknown coatings, suspected contamination, or appliance incompatibility. Warping and casting variation require judgment about the actual cooking surface and heat source.
Do not grind off a heat ring to make a pan fit. That can change structure, value, and surface condition while creating dust and uncertainty.
Limits and important notes
Heat-ring performance varies across gas, electric-coil, solid-plate, induction, and smooth-top appliances. Induction compatibility and safe contact depend on the appliance and pan, not the visual presence of a ring alone.
This is general cookware guidance, not authentication, valuation, repair, appliance, or food-safety advice. Follow manufacturer instructions and seek qualified assessment for vintage or damaged items.
Frequently asked questions
Does a heat ring mean the pan is warped?
No. It is a design feature. Test overall stability and flatness separately on a cool safe surface.
Can I use a heat-ring pan on glass?
Only if the appliance instructions allow its weight, base, and contact. Lift rather than slide and keep the underside clean.
Should I remove rust from the ring?
Light routine rust may be treatable with appropriate care, but cracks, heavy scaling, unknown residue, or historic value justify expert advice.
Sources and evidence notes
This article applies general cast iron inspection, stove compatibility, gradual heating, lifting, smooth-cooktop, and storage principles. Appliance and cookware instructions, material condition, prior use, and professional assessment determine safe use.
Conclusion and next steps
Clean and inspect the underside in good light, then test the cool pan's stability on the intended switched-off stove. Check the appliance manual before heating. Use gradual heat, lift on smooth surfaces, and retire the pan from cooking when cracks, instability, or unknown history remain unresolved.




 OKay Home Renovation and House Painters5.0 (4 reviews)
 OKC Renovations5.0 (26 reviews)
 BathPlanet of Oklahoma4.0 (5 reviews)
 TLC Renovation4.0 (48 reviews)
 The Tile Genie4.0 (9 reviews)
 Mendoza's Quality5.0 (36 reviews)
 How to Refurbish a Cast Iron Skillet at Home: A Complete Guide
 Best Products for Cast Iron Restoration Service: Top Tools and Products
 Simple At-Home Techniques for Cast Iron Restoration | Restore Your Cookware
 How to Restore Cast Iron at Home | A Complete Guide for Beginners
 How Long Does Cast Iron Skillet Refinishing Take? Realistic Timeline for Restoration
 What to Avoid When Attempting Cast Iron Refinishing: Common Mistakes to Watch Out For